Tuesday, December 14, 2010

Photography 101 - How to get great Christmas Tree photos


Ahhh... tis the season to get run over in the Costco parking lot. Be careful out there. Everyone is NUTS.

But it's also the season of giving and of taking sweet photos of the kids decorating the tree and opening gifts. So I thought I'd give some pointers on how to get great tree decorating photos.


Rule #1 - turn OFF the flash. Flash will interfere with the awesome lighting that comes naturally with christmas lights (so be sure you put your little twinkly lights on the tree first).

Rule #2 - crank up the ISO. Without flash and working in low light, you'll need to set your camera on a high ISO setting. The ISO is basically the sensitivity of your camera to light. The higher the ISO, the higher it's sensitivity to light. This is necessary in low light situations, so that you can still have a relatively fast shutter speed so you don't get major blur in your photos.

Rule #3 - Get IN the tree. We've all got tons of photos of the backs of our kids decorating the tree. But what we're missing is that intense expression on their face while choosing just the right spot for that ornament they made and are so proud of. And we're missing those adorable little hands attempting to hang the heaviest of our ornaments on the thinnest and weakest tree branches. So I tend to position myself, in the tree, just opposite of where my kids are, shooting through the tree branches. This way, we also get the benefit of using the tree lights which cast a really unique and special light on those adorable little faces.


Happy Holidays to everyone. And if you're looking for unique photo gifts, check out www.TrishBarkerPhotography.com and click on our Products link. If we've taken your photo during 2010, then we've got your photos on file. OR, we can use your photos as well. We offer Christmas Cards, Photo Books and Albums, Jigsaw Puzzles, Dry Erase Boards and other unique, high quality photo gifts. And we offer flat rate $7 overnight shipping until December 22nd!

Tuesday, November 23, 2010

It's All Good


So, this is one of my favorite pictures ever. One, because it features one of my most favorite people ever, but also because I just love the photo. But I didn't love it when I took it.

I realized about 20 snaps in, that I was shooting on the beach in the bright sun, and had never changed my ISO setting on my camera from the super high ISO I'd set to capture images from the previous evening's lantern walk at sunset.

The result was this:


Less than a good photo. Totally overexposed and grainy. I was so bummed, but I resisted that urge to delete them all because I've learned that sometimes life's mistakes end up yielding great results.

I'm glad I resisted. I just played around with the exposure and contrast and ended up with a picture that I love. So much so that I'm putting in on canvas.

So, the moral of this story, is if you're over-tired and overwhelmed with 3 kids off from school and you find that you're being more of an idiot than usual... don't hit delete. Everything happens for a reason...

Monday, October 18, 2010

Trish Barker Photography Cutest Kid Contest Begins Today!


The Trish Barker Photography Cutest Kid Contest starts today. Enter your cute kid by posting a photo to our Facebook wall and the photo with the most "likes" as of 12:00am, November 15, 2010 wins a free professional photoshoot by Trish Barker Photography (a $300 value) just in time for holiday cards and gifts!


Post your cutest kid photo to our wall and then make sure all of your friends cast their vote for your cute kid by "liking" your photo. To share your photo, click "share" underneath your photo post and send a message to your friends telling them to like your photo before 12:00am November 15th, 2010.


Winner will be announced on the Trish Barker Photography Facebook wall November 16, 2010 at 10:00am HST. Open to Maui residents only. For your cute kids safety, we suggest you only post their first name or initials. We also suggest you do not tag children with full names in your photo.


Free Photoshoot Includes:

~ One hour of shooting time at your location of choice with up to 4 people.

~ Image perfection and post production work

~ Between 30-50 images to choose from in an online gallery

~ Free 8x10 photo of your choosing


(additional prints/files can be purchased a la carte)

Tuesday, October 12, 2010

Pic of the Week


I love lotus. They are beautiful and have such perfect symbolism. I love this particular photo because, even though I took it, when I look at it... I can't tell if it's a photo or a painting...

Wednesday, June 30, 2010

Pic of the Week - June 29, 2010


So, it seems I've developed a bit of an obsession with feet recently. I've been taking lots of photos of feet, perhaps because I haven't seen my own in a couple of months. But I also haven't seen much of my waist, knee caps or dignity... so perhaps there's some other reason?

Yes, feet are incredibly expressive! The above feet are pruny little 4 year old feet, contemplating whether or not to get back in the cold pool for the rest of swim class. (they opted not too)

Check out the below pic. What does it say to you?


It said to me "nervous bride". Which was exactly what she was, and I just loved how her feet spoke her nervousness so poignantly.

And of course, who can resist teeny tiny feet.


These just say "bite me"... but like, in a good way. So cute. Some of my favorite photos out of baby portrait sessions involve teeny tiny feet.

So, there you have it. A little taste of my photography foot fetish. Hey, atleast I didn't post any pics of my own feet. You're welcome.

Tuesday, June 15, 2010

Photography 101 - How to Take a Great Self Portrait


Whether it be for Facebook, work, etc., seems we all need a good photo of ourselves at some point and there's not always someone around when we need them. So, here are some tips for taking a great self portrait, on your own, with your simple digital point and shoot camera.

Rule #1 - TURN OFF THE FLASH!I am not a fan of flash at all, for any photos really. And this is especially the case when you're taking a photo of yourself at close range. The flash will WAY over expose you, make you shiny, wonk up the coloring, etc., so just turn it off. If you don't know how to turn off the flash on your particular camera, Google it. Then, find yourself a nice window to sit in front of. Window lighting is by far the best lighting for portraits, which is why so many pro's use it for their photos. So, plop yourself down in front of a window with your flash disabled.

Rule #2 - Use Portrait ModeNowadays, many even basic model digital cameras have a "Portrait" mode to shoot in. This mode is normally shown as a picture of someone's profile. Don't have one? Do you have a picture of a flower? This is known as "macro" mode, and this would work as well. Both of these modes create a shallow depth of field, meaning that (if focused properly), the main subject is in sharp focus (that would be you) and then the background is blurred.

Rule #3 - Position Your CameraHold your camera as far away from you as possible and position the camera above you so that you have to look up slightly (but don't tilt your whole head, just lift your eyes so that they are looking into the lens). About 45 degrees and slightly off to the right or left, depending on which hand you're using to hold your camera.

Rule #4 - Shoot, Review, then ReshootSo, take that first shot. Then look at it. Notice what might not be working. Is it angled too high? Are you centered in the photo? Are you the largest part of the photo? (if not, you should be... zoom) Does your hand or camera block the natural lighting you're using leaving dark shadows on your face? Are your eyes in sharp focus? Take note of what works and what doesn't and then change your position, reshoot and review.

Do this until you find one you like. This process is made much easier with auto focus, so make sure you're using that if your camera has it. But it's not absolutely necessary... the below shot was taken with manual focus, it just took a bit more trial and error to get the focus right.


Have you noticed something about these photos? Yup... black and white. Most digi cameras have a black and white mode (and or you can modify them to be black and white once they're uploaded to your computer). Again, don't know how to do that for your camera model? Then Google it. I personally prefer black and white for portraits. So give it a whirl and see what you think.

Most of all, have fun, smile, try different expressions. Play. Photography is supposed to be fun, and it's only when your having fun that you'll like the results.


And last but not least, can't get a good photo? Live on Maui? Call me.

If you want a professional shot, hire a professional. I'm running half price specials on portrait shoots for a limited time.

Go to www.TrishBarkerPhotography.com and contact us to set up a photo shoot today!

Tuesday, June 8, 2010

Pic of the Week - 6/8/10


I soooo love this picture. Kids get so excited about their birthdays. I feel many things when that fateful day rolls around, but excitement tends not to be one of them. Such a shame how as we "grow up", we lose our sense of excitement.

So, this year I'm going to embrace my birthday, and I'm going to be happy and stoked that I'm turning another year older, bringing me (hopefully) more wisdom and more wonderful experiences with my friends and family.

Kids... such brilliant little sages. So glad I've got mine in my life!

Sunday, May 30, 2010

Pic of the Week - May 31, 2010

We'll call this the Good Karma Chameleon. Because today, several good things happened (and I'd like to believe it's a result of Good Karma), and then this little beauty appeared in our garden. I've been wanting to take photos of a Chameleon for months now and haven't been able to find one.

So we'll just ignore the fact that I was sitting in the middle of a spiders nest while snapping photos of this lovely creature and that I was COVERED in baby spiders by the time I was done snapping and realized. It's amazing how fast an 8 month pregnant woman can move when the need calls...

Tuesday, May 25, 2010

Pic of the Week - May 25, 2010

So this weeks pic of the week is a flower, whose name escapes me. If anyone can remind me what these are called, I'd greatly appreciate it. This is another "side of the road" pitstop, which seems to be causing much distress to the locals.

I hope I never stop acting like a tourist. I almost always have my camera on, I randomly pull to the side of the road without warning and wave at the pissed off locals as they pass me by. I can see them mouthing "f-ing tourist", which I can understand, because my behavior is very tourist-esque, and I've got a serious lack-of-tan going on at the moment.

But I did not move to Maui so that I could become engrained in road rage and take my environment for granted. I came to Maui, because its ridiculously beautiful and the perfect place to raise my family. So to you locals, who seem to have lost your way a bit, take some advice from the pasty white psuedo tourist and instead of flicking me off, appreciate that I still look around and say "Damn I'm lucky to live here".

Thursday, May 13, 2010

Pic of the Week - May 13, 2010


This weeks pic is from my marvelous drive home. Each day, I can choose to take the lower highway, or the upper highway. I tend to take whichever has the green light when I'm there, but from April to the end of May, whether the light is red or green, I opt for the upper highway. This is because the Jacarandas, my favorite trees that I first saw in South Africa 11 years ago, are in full bloom. They literally litter this road. Every turn is bursting with more purple.

Proof, that it definitely pays to "take the high road" every now and then...

Thursday, April 29, 2010

Pic of the Week 4/29/10


Taken by(REUTERS/Lucas Jackson)

So, obviously, I didn't take this picture. This is just one of several incredible photos of that recent Icelandic eruption, that my husband stumbled upon online when doing his daily weather check (yes... we live in Hawaii and each day husband HAS to check the weather. Seriously honey... it'll be 80 degrees and the water will be 80 degrees. This forecast applies 99.9% of the time). But, this time when he said "Trish, you've got to see this", it actually captured my interest!

Click here to see more really stunning photos of this latest attempt of Mother Earth to get her message across: http://www.boston.com/bigpicture/2010/04/more_from_eyjafjallajokull.html


Sunday, April 18, 2010

Photography 101 - Do it RAW

So this has to be like, my number one tip for getting good photos more consistently. Shoot RAW. I use only digital, so if you're still using film... this post isn't for you. But if you shoot digital, then shooting in RAW format and having Photoshop CS3 or higher can help you to improve photos, make them more dynamic, or even save a poorly exposed shot when you were too concerned with getting the shot and didn't expose it properly (this happens a lot with me because I love to shoot candid, and I'm a scatter brain)

Example
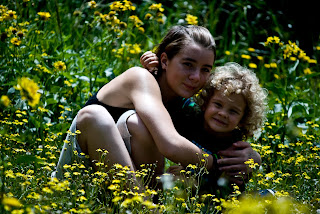
I forgot to change the white balance on my camera before moving from studio to shooting outside. I also didn't have my speedlight and so the subjects were backlit. Then I wanted to soften the look of the photo, change the coloring a bit, etc.

Original RAW photo


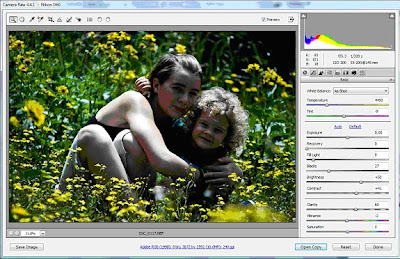
Modified Pic with changes made in Photoshop


As you can see, the finished product is dramatically different. If I'd shot this photo in jpeg, it would have been lost. Granted, I would have been able to modify the color, the exposure and the contrast, but the biggest problem with the photo was the backlighting of the main subjects. By shooting raw, I was able to, with simply a click and drag, add natural looking fill lighting that saved the photo without it looking at all "produced".

Want to find out how to shoot RAW?

Most digital cameras have "file format" options like "normal jpg", "fine jpg", "super fine jpg", and "RAW". These settings tell your camera how you want the camera to shoot and save your files to your memory card.

When you shoot in any level of jpg, the image is compressed to make it smaller. The benefit of this is that with the smaller file size, you can fit many more photo files on your memory card. The disadvantage is that you lose the fine details, and your ability to work with your photos in detail. If your concern is being able to eek out as many photos as possible from your memory card, and you don't (or don't want to) do any post production work to improve your photos then having these smaller files is probably fine for you.

But, if you're like me, and want to be able to work with your photos as much as possible to make sure they're the best they can be, then I highly recommend shooting RAW. This does significantly increase the size of the files so it's likely you'll need to invest in a larger memory card, but the benefits can be well worth it. Keep in mind, when you shoot in RAW, you'll need to have some sort of software that can read your raw file and allow you to work with it. I currently use Adobe Photoshop CS3. But with CS3 specifically, when I click on a file to open it, it automatically provides me with the photo in preview, and all of the settings that I can modify before even opening the file:


This, my friends, is where I take my "oh shit!" moments, and make them shine.

Now if only there was a way to apply this method to life...

Thursday, April 15, 2010

Pic of the Week 4/15/2010

So this weeks pic of the week is a reminder to stop and smell the roses. I was going to have this be a picture of me actually smelling the rose, but... being Italian, I wasn't terribly comfortable with the nose to rose ratio... so we kept it simple.

This rose bush is in my front yard, directly to the left of where I park my car. Despite years of neglect, if it rains for a day, this is the gift I come out to in the weeks following. Even on those mornings when I'm in a wicked rush (every morning)... I just can't pass this by without stopping for a little sniff and a brief moment to appreciate what beauty mother nature provides to us, despite our constant misconduct.

Cliches are cliches for a reason. So slow down, file your taxes (or your extension for those of me that can't get my act together... yes, I know who I am) and remember that it's the little things...

Thursday, April 1, 2010

Hot Chics! Pic of the Week - April 1, 2010


So this weeks pic of the week isn't really a great picture... but it definitely shows it pays to be a freak like me, snapping photos all the time. I thought my kids grew fast... yikes!

I'm seriously fascinated at how fast chickens grow! This is Lemon Chicken (yum), my chicken and the only surviving chicken from our first batch. Leftmost is at 1 week and rightmost is just 3 weeks later. Pretty amazing. I especially like the middle picture because you can see her little drumsticks forming.

Don't worry, our chickens aren't for eating. We got them for eggs. But if I keep getting stuck cleaning the chicken coup... I may just change my mind...

Tuesday, March 30, 2010

Photography 101 - High Key Studio Lighting


So what's my favorite thing about High Key Studio Lighting? The results! They just look clean, happy and ultra good.

You see a lot of high key shots taken for fashion photography, shampoo and soap commercials, etc. It just makes your models look great and it's upbeat and makes you feel good. Is it as easy as low key? Pretty much. But it does require more lights (I shoot low key with one light... high key requires 3... atleast they way I do it).

So, here's what my set up consisted of:
1. White backdrop and floor drop
2. Two 500 watt tungsten Interfit EZ lights without the umbrellas.
3. One speedlight on my camera (I use the Nikon SB-900)
4. Beautiful models!

So, the objective here is to expose your background MORE than your main subject. So I set up my two 500 watt lights, right in front of my backdrop, pointing inwards so that they lit up the backdrop nicely. (it's important to note that you have to change the White Balance on your camera when shooting in a studio... I use Tungsten lights so I change the white balance to "incandescent" so that my photos are exposed properly)

I then put my models about 10 feet in front of the backdrop. And I stood at varying distances away from my models to test what distance would give me the best light. I was shooting at 400 ISO for some and 800 ISO for others, depending on how many models were in the shot and the look I was going for. I used my speedlight, pointed at the white ceiling with a white bounce card, as my main light on the models.

The only issue I had was my speedlight kept overheating. I've got to research what in the world to do about that, because I had to keep taking breaks to let the speedlight recover, but the girls were patient and the results were... well... pretty awesome.


To see more examples of High Key Studio Lit photos, you can check out our portfolio at http://www.trishbarkerphotography.com/.

Wednesday, March 24, 2010

Pic of the Week - March 24, 2010


This week's pic of the week was chosen by my model. She loved this photo and since she's been working for free... I figured I'd oblige. Plus, I have to agree with her... it is pretty cool.
More new pics from our latest shoots up on http://www.trishbarkerphotography.com/.

Tuesday, March 23, 2010

Photography 101 - Low Key Studio Lighting


So I've finally set up my home studio to find out that... lighting is a bitch! Actually, that's how I felt about it for the first couple of hours when NONE of the results were what I wanted. Then I decided to... gasp... read the manuals on my new lights. Amazing... there were some major things (that I'll share in a minute) that made all the difference. Then it was just a matter of playing around to get the angles and moods that I wanted.

In studio photography lighting, there's two schools; High Key and Low Key. Both make an intensive use of contrast, but in different ways. High key is usually considered happy and clean (very bright, often on white backgrounds). Being that my subject (and free model) was a teenager, I figured low-key photography (darker, moodier) would be best fitting.... ha ha.

I also found lighting for low-key was a lot easier, being that I only needed one light. So here's what I used:

1. 1 Black Background and floor drop
2. 1 Interfit EZ-Lite with Umbrella (60 watt tungsten bulb)
3. 1 Surprisingly smily teenager

The first thing you should do when you start shooting in a studio, is to change the white balance for your camera. Most cameras are set to outdoor, or sun light shooting. Since I was shooting with Tungsten light, I changed the white balance on my camera to Incandescent (though, some cameras have a Tungsten setting that would have been appropriate). This keeps your shots from all coming out orange, which is what I was dealing with for a while before I read my manual and changed the white balance to the appropriate studio lighting setting.


The second thing to do is to play around with the ISO. I was shooting some at ISO 400 and some at ISO 800. Any lower and I was suffering from blurriness. I like to shoot candid... so I needed to increase the ISO so that I could still capture those moments with the moodier, darker lighting.


Then, position your subject about 10 feet from the backdrop, and then your light fairly close to your subject. I placed my light about 45 degrees to the right of my subject, with it positioned high above her. This makes for more natural looking lighting.


Then I just played around with the angle of the light, moving it slightly to see what affect it had on the way the light and shadow played on the subject. And just kept shooting. And here's a couple of examples what I came up with:


So, next we'll explore High Key studio lighting, which takes a bit more patience, and definitely more lights. For more examples of Low Key, High Key and Natural light photos, check out our website at http://www.trishbarkerphotography.com/.

Thursday, March 18, 2010

Pic of the Week - March 18, 2010


Okay, so I chose this photo for this weeks Pic of the Week, not because of it's photographic merit, but because everyone who see's it cutes out on themselves. It is quite adorable if I do say so myself. This is my favorite thing about photography... capturing those rare moments. Sometimes my itchy trigger finger pays off.

I also chose this particular photo because 5 or our 6 chics became squeeker toys for our dog and... well... didn't make it. Lesson learned: Don't count your chickens before they hatch. Or even after they hatch... if you have a dog.

Saturday, March 13, 2010

Photography 101 - How to Color Only Portions of Your Photograph


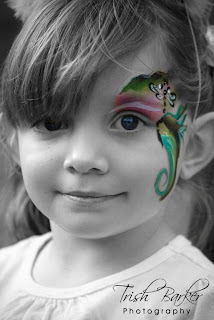
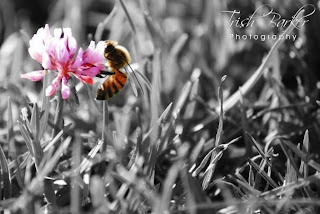
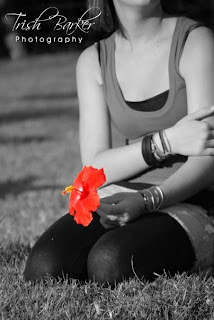
I love black and white photography. But what I love more is black and white photography with an emphasis on a particular color element, like the one above. It just adds a little something and can really make a photograph pop. This is super easy to do and I'll tell you how. I use Photoshop CS3 for my photo editing.

Step One - choose a color photograph that you have. (The original photo has to be color and then it's converted to black and white.)

Step Two - open your color photograph in Photoshop

Step Three - make a copy of the background layer, so you've essentially got two layers of your color photograph. (Go to Layer > New > Layer from Background)

Step Four - convert the top layer to black and white. (Select top layer > Go to Image > Adjustments > Black and White > make adjustments as necessary until you're happy with how it looks)

Step Five - staying on the top layer that you've converted to black and white, choose the color element that you want to expose and simply erase away the black and white layer portion. This will expose the color behind and leave you with cool photos like these:


And there we have it. Pretty easy way to make your photos pop. You can see more examples of how I use this affect on photos by visiting www.TrishBarkerPhotography.com.

Have fun!

Friday, March 12, 2010

Our New Blog!


I know right... like there needs to be another blog. I promise I'll try and keep it interesting.

We'll use this blog to share photos from our favorite events, to post our Pic of The Week, and to share specials and opportunities.

We'll also share photographic advice, based on our accidental triumphs, and frustrating failures.

So, welcome and thanks for visiting. To see our existing portfolio, check out our website at www.TrishBarkerPhotography.com.