Tuesday, March 30, 2010

Photography 101 - High Key Studio Lighting


So what's my favorite thing about High Key Studio Lighting? The results! They just look clean, happy and ultra good.

You see a lot of high key shots taken for fashion photography, shampoo and soap commercials, etc. It just makes your models look great and it's upbeat and makes you feel good. Is it as easy as low key? Pretty much. But it does require more lights (I shoot low key with one light... high key requires 3... atleast they way I do it).

So, here's what my set up consisted of:
1. White backdrop and floor drop
2. Two 500 watt tungsten Interfit EZ lights without the umbrellas.
3. One speedlight on my camera (I use the Nikon SB-900)
4. Beautiful models!

So, the objective here is to expose your background MORE than your main subject. So I set up my two 500 watt lights, right in front of my backdrop, pointing inwards so that they lit up the backdrop nicely. (it's important to note that you have to change the White Balance on your camera when shooting in a studio... I use Tungsten lights so I change the white balance to "incandescent" so that my photos are exposed properly)

I then put my models about 10 feet in front of the backdrop. And I stood at varying distances away from my models to test what distance would give me the best light. I was shooting at 400 ISO for some and 800 ISO for others, depending on how many models were in the shot and the look I was going for. I used my speedlight, pointed at the white ceiling with a white bounce card, as my main light on the models.

The only issue I had was my speedlight kept overheating. I've got to research what in the world to do about that, because I had to keep taking breaks to let the speedlight recover, but the girls were patient and the results were... well... pretty awesome.


To see more examples of High Key Studio Lit photos, you can check out our portfolio at http://www.trishbarkerphotography.com/.

Wednesday, March 24, 2010

Pic of the Week - March 24, 2010


This week's pic of the week was chosen by my model. She loved this photo and since she's been working for free... I figured I'd oblige. Plus, I have to agree with her... it is pretty cool.
More new pics from our latest shoots up on http://www.trishbarkerphotography.com/.

Tuesday, March 23, 2010

Photography 101 - Low Key Studio Lighting


So I've finally set up my home studio to find out that... lighting is a bitch! Actually, that's how I felt about it for the first couple of hours when NONE of the results were what I wanted. Then I decided to... gasp... read the manuals on my new lights. Amazing... there were some major things (that I'll share in a minute) that made all the difference. Then it was just a matter of playing around to get the angles and moods that I wanted.

In studio photography lighting, there's two schools; High Key and Low Key. Both make an intensive use of contrast, but in different ways. High key is usually considered happy and clean (very bright, often on white backgrounds). Being that my subject (and free model) was a teenager, I figured low-key photography (darker, moodier) would be best fitting.... ha ha.

I also found lighting for low-key was a lot easier, being that I only needed one light. So here's what I used:

1. 1 Black Background and floor drop
2. 1 Interfit EZ-Lite with Umbrella (60 watt tungsten bulb)
3. 1 Surprisingly smily teenager

The first thing you should do when you start shooting in a studio, is to change the white balance for your camera. Most cameras are set to outdoor, or sun light shooting. Since I was shooting with Tungsten light, I changed the white balance on my camera to Incandescent (though, some cameras have a Tungsten setting that would have been appropriate). This keeps your shots from all coming out orange, which is what I was dealing with for a while before I read my manual and changed the white balance to the appropriate studio lighting setting.


The second thing to do is to play around with the ISO. I was shooting some at ISO 400 and some at ISO 800. Any lower and I was suffering from blurriness. I like to shoot candid... so I needed to increase the ISO so that I could still capture those moments with the moodier, darker lighting.


Then, position your subject about 10 feet from the backdrop, and then your light fairly close to your subject. I placed my light about 45 degrees to the right of my subject, with it positioned high above her. This makes for more natural looking lighting.


Then I just played around with the angle of the light, moving it slightly to see what affect it had on the way the light and shadow played on the subject. And just kept shooting. And here's a couple of examples what I came up with:


So, next we'll explore High Key studio lighting, which takes a bit more patience, and definitely more lights. For more examples of Low Key, High Key and Natural light photos, check out our website at http://www.trishbarkerphotography.com/.

Thursday, March 18, 2010

Pic of the Week - March 18, 2010


Okay, so I chose this photo for this weeks Pic of the Week, not because of it's photographic merit, but because everyone who see's it cutes out on themselves. It is quite adorable if I do say so myself. This is my favorite thing about photography... capturing those rare moments. Sometimes my itchy trigger finger pays off.

I also chose this particular photo because 5 or our 6 chics became squeeker toys for our dog and... well... didn't make it. Lesson learned: Don't count your chickens before they hatch. Or even after they hatch... if you have a dog.

Saturday, March 13, 2010

Photography 101 - How to Color Only Portions of Your Photograph


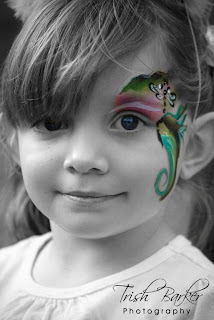
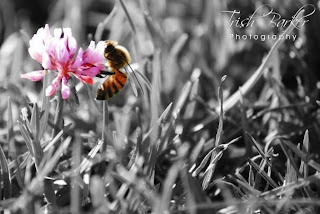
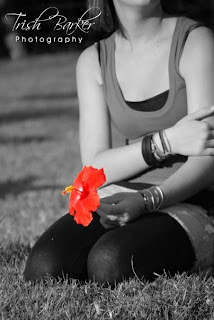
I love black and white photography. But what I love more is black and white photography with an emphasis on a particular color element, like the one above. It just adds a little something and can really make a photograph pop. This is super easy to do and I'll tell you how. I use Photoshop CS3 for my photo editing.

Step One - choose a color photograph that you have. (The original photo has to be color and then it's converted to black and white.)

Step Two - open your color photograph in Photoshop

Step Three - make a copy of the background layer, so you've essentially got two layers of your color photograph. (Go to Layer > New > Layer from Background)

Step Four - convert the top layer to black and white. (Select top layer > Go to Image > Adjustments > Black and White > make adjustments as necessary until you're happy with how it looks)

Step Five - staying on the top layer that you've converted to black and white, choose the color element that you want to expose and simply erase away the black and white layer portion. This will expose the color behind and leave you with cool photos like these:


And there we have it. Pretty easy way to make your photos pop. You can see more examples of how I use this affect on photos by visiting www.TrishBarkerPhotography.com.

Have fun!

Friday, March 12, 2010

Our New Blog!


I know right... like there needs to be another blog. I promise I'll try and keep it interesting.

We'll use this blog to share photos from our favorite events, to post our Pic of The Week, and to share specials and opportunities.

We'll also share photographic advice, based on our accidental triumphs, and frustrating failures.

So, welcome and thanks for visiting. To see our existing portfolio, check out our website at www.TrishBarkerPhotography.com.